Trove
Vintage Fashion for the Modern Girl
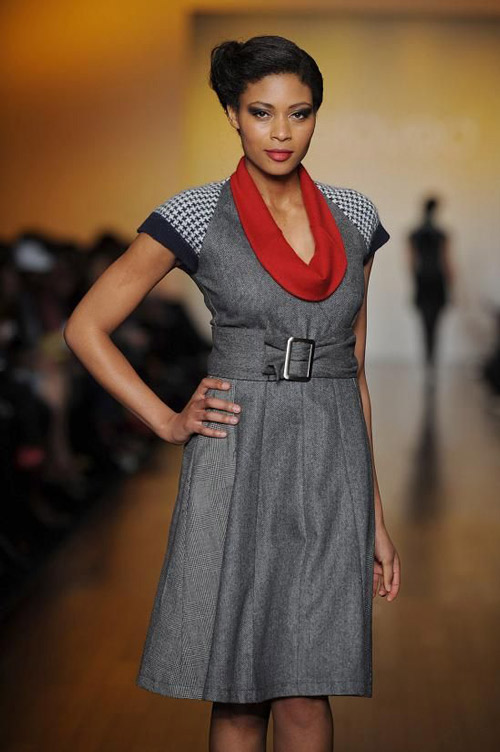
Preloved Spring 2009 Collection
Vintage Reconstructed: Ideas for Upcycling
Preloved is making an impact on the environment, and so can you
November 9, 2013
You know how much we love upcycled couture. We’ve all had that experience of finding an amazing vintage item that is either damaged or ill-fitting—but we love it anyway and can’t bear to leave it behind. What can we do to bring new life to such items? This article will showcase what some designers are doing to repurpose and reconstruct discarded vintage items, and how you can do it yourself!
The Canadian design house Preloved has figured out how to make vintage reconstruction into a comercial fashion line with its quirky and unique garments made of leftover clothing stock. In 2008 alone, it salvaged 60,000 wool sweaters, 12,000 T-shirts, 5,000 dress shirts, and 6,000 trench coats—and it’s still going strong! We believe in our heart of hearts that we loved Preloved way before we even came across the label (as its name implies), and we think you’ll feel the same about it, too.
We first came across the inventive clothier when we became neighbors in the Green Room atDesigners & Agents LA last June. We quickly noticed how popular its Frankensteinesque (in a good way) creations were with buyers, and we knew we had to check it our for ourselves. This year, we were lucky enough to bump into Preloved again in February at D&A in NYC. The eclectic collection was even more droolworthy than the last, with colorful stripes paired with delicate Fair Isle and brocade. Fabrics with old-school written all over them rebuilt into modern, wearable shapes.
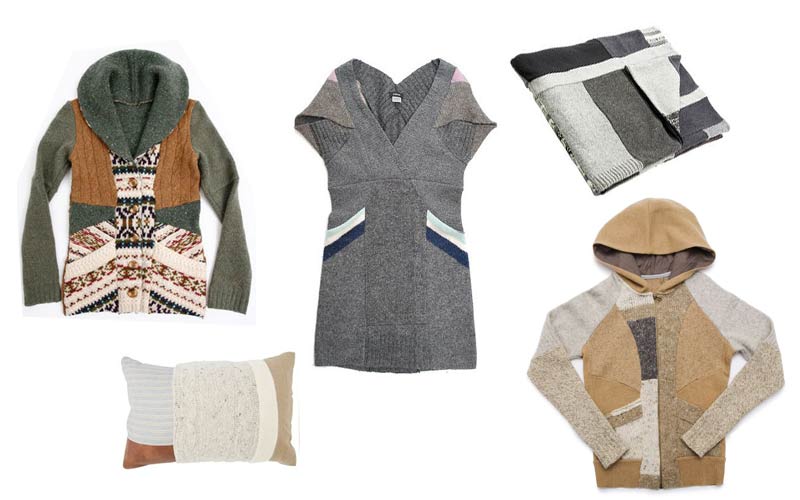
Preloved Fall 2013 Collection
You too can reconstruct sweaters at home. Here’s a great idea for a lightening bolt sweater.
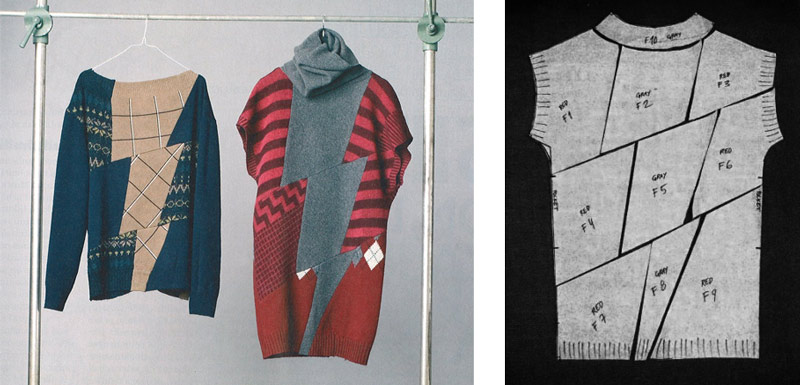
Just find two sweaters with contrasting colors, and cut them up according to the diagram. Sew each of the three main sections separately (F1 + F2 + F3), (F4 + F5 + F6), and (F7 + F8 + F9). Then combine all of the componant parts. Easy!
From the Preloved Fall 2013 Collection
"I love re-purposing projects, because you get to take something useless to you and make it useful again...or maybe even something you love."

How to turn a sweater into a cardigan
Another great idea for vintage sweater reconstruction come from Delia, of the Delia Creates blog. She writes:
I love re-purposing projects, because you get to take something useless to you and make it useful again…or maybe even something you love.
Such is the case with some too tight, too short sweaters I had, that I converted to cardigans.
With most cardigans you have buttons that line the length of it so you could technically wear it as a blouse if needed.
With these cardigans, because they are starting out as too tight and too short sweaters, there are only two to three buttons that clasp the cardigan partially closed. This is how I wear most of my cardigans anyway…so it works!
Materials:
- You just need two strips of matching or complimentary fabric, about 2 inches wide and at least 2 inches longer than the length of your sweater down the middle. A cute fat quarter will work for many sweater lengths and gives you plenty of fabric. If you want your cardigan to clasp close you will also need some buttons, or toggles and some elastic.
- Matching thread looks best…but as you’ll see I didn’t for two of my cardigans. You use so little thread with this project…and I’m cheap.
Let’s begin.
- MAKE SURE you pre-wash your fabric. This is an absolutely must. If you skip this step, the fabric will shrink, and pucker and pull on the sweater in unattractive ways when you wash it.
- Measure and cut your fabric strips. Two inches wide and at least two inches longer than the length of your sweater down the middle.
- Cut your sweater down the middle. I made some faint marks with a ruler and pencil to make sure I cut it nice and straight. *Be careful not to stretch your sweater as you measure and cut.
- Iron one long side of your fabric strips under about 1/4 of an inch.
- Pin and sew the fabric strips to the cut portion of your sweater. You want right sides together. The side with the fabric ironed over is the wrong side. Don’t skip the pinning. Sweaters often stretch and pull. Pinning will help you keep everything even and where it should be. Also, I highly recommend you increase your stitch length a bit since you are working with sweater knit. It will pull on the fabric less, create more even stitches with no skipping…just a good idea. You probably should also use a ball point needle made for knits…but I didn’t. I just used a universal needle with an increased stitch length.
- Flip the fabric strip over and fold under each side of the sweater/cardigan. Fold the top and bottom portions under as well. Pin {don’t skip this} and sew. You can sew near the inside seam, or not. I didn’t for this one, but did for others.
- Last step! You can just leave it as is, or add buttons. Remember what I said about increasing your stitch length? Well…I should have done it with my button holer too. I didn’t with this yellow cardigan and the button holer kept breaking my thread, stretching my fabric and ended up giving me less than desirable results.
Don’t know how to use a button holer? This tutorial from MADE or this one from Grosgrain can help you. I learned from the Grosgrain one because I have a Brother sewing machine like Kathleen.
For this tan cardigan I put in toggles. I just picked up some toggles in the buttons/notions aisle at Jo-Ann and snagged some tan ponytail holders from Walmart. For my sweater I only needed two ponytail elastics, half of one elastic for each loop.

At step 5, just sandwich the elastic in between the fabric strip and sweater and sew it in. Make sure to go back and forth over it a few times to strengthen the seam where the toggles are. It can be fussy to get the elastic sewn in initially, but with a little patience it turns out quite nicely.
I also top stitched over the inside seam when I was done, to strengthen the seam and toggles even more.
P.S. If you’re wondering how these wash. I just washed mine and they did great. Just remember to follow original washing instructions for the sweater you re-fashioned. Depending on what fabric you choose to line the inside with, you might need to re-press it after each wash. I used cotton and I didn’t have to do any pressing.
Happy Re-fashioning!


Comments are closed.